Version: v1.0 Author: 1464
Creating a Discord Server
Creating a Discord Server
Step 1: Create a Server
- Open Discord: Log in to your Discord account.
- Click on the "+" button: This is located on the bottom left of the sidebar.
- Create a Server:
- Choose the option "Create My Own" or use a template.
- Enter a server name.
- Optionally, upload an icon for your server.
- Click "Create".
(Optional) Step 2: Customize a Server
-
Create Channels:
- Text Channels: Click the "+" next to "Text Channels" to add channels (e.g., #general, #announcements).
- Voice Channels: Click the "+" next to "Voice Channels" to add channels (e.g., General).
- Categories: Organize channels into categories by clicking the "+" next to the server name and selecting "Create Category".
-
Set Up Roles:
- Go to "Server Settings" (click on your server name at the top and select "Server Settings").
- Click on "Roles" and then the "+" button to create new roles.
- Customize permissions for each role (e.g., Admin, Moderator, Member).
- Assign roles to members by right-clicking on their username and selecting "Roles".
--
Setting Up Auto Screenshot Software
Setting Up Auto Screenshot Software
Step 1: Download the Software
- Visit the Official GitHub repo: Go to the Auto Screenshot GitHub page.
- All credits to artem78, support him if you like the software!
- Download the Installer: Scroll to the bottom and download either the Windows portable version or installer.
- AutoScreenshot_v1.16_Windows_portable.zip or AutoScreenshot_v1.16_Windows_setup.exe
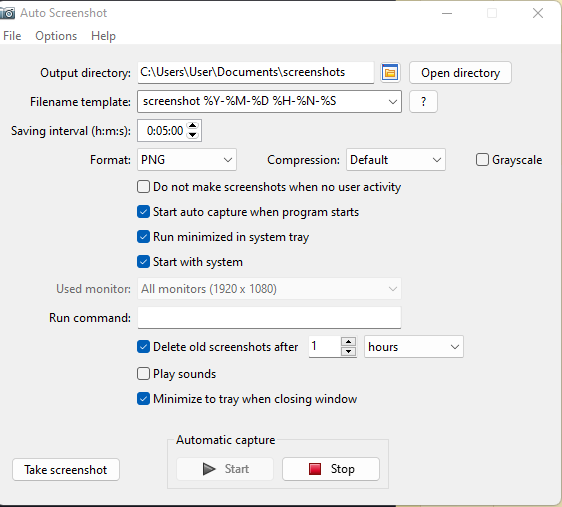
Step 2: Configure Auto Screenshot
- Choose Save Location and Filename template: Select the output directory folder where the screenshots will be saved together with Filename template which will be used to name the files.
- Set Screenshot Intervals: In the application settings, configure the intervals at which screenshots should be taken.
- Adjust Capture Settings: Configure additional settings like image format, compression and various checkboxes.
- DO NOT check the "Do not make screenshots when no user activity" option!
- Set Deletion Intervals: To prevent cluttering space, set a reason able time interval in which the taken screenshots will be automatically deleted.
Step 3: Start Taking Screenshots
- Start the Service: Click on the "Start" button within the application to begin automatic screenshot capture.
- Monitor Activity: Ensure the application is running in the background to continuously capture screenshots at the set intervals.
Details
Setting Up Auto Upload to Discord Server
Setting Up Auto Upload to Discord Server
Step 1: Download the Software
- Visit the Official GitHub repo: Go to the DAU GitHub page.
- All credits to tardisx, support him if you like the software!
- Download the Installer: Scroll to the bottom and download binaries for Windows.
- dau-win-v0.12.4.zip
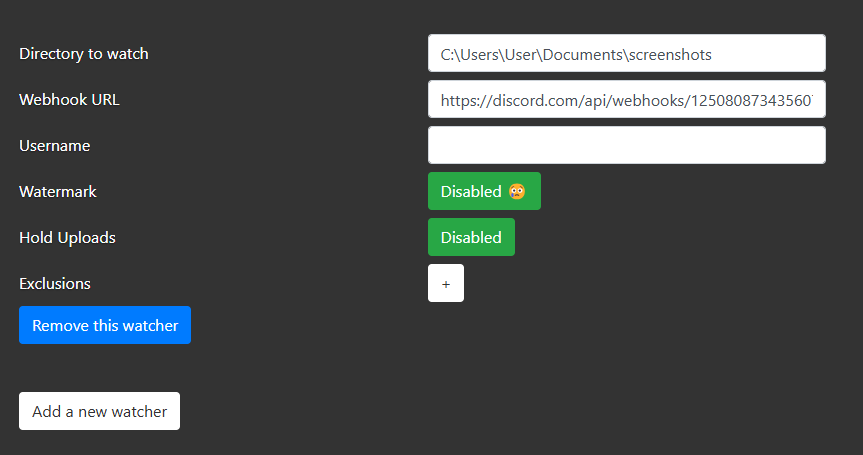
Step 2: DAU Config
- Unzip the downloaded file and open the DAU app: This should automatically open your browser windows and land you on the localhost:9090 page.
- Go to Config tab at the top menu.
- Global configuration: Lets you setup server ports and general startup settings.
- Watcher configuration: This is where you setup a webhook to your discord server. Multiple watchets can be setup to upload to multiple servers.
- Firstly, check this link for a step by step guide on how to get your Discord server Webhook URL.
- After you have everything ready, simply copy and paste the directory path for where your screenshots folder is located.
- Then paste the Webhook URL you just created.
- Lasty, save the settings at the bottom of the page.
Details
Step 3: Finishing up
Monitor Uploads: Ensure that the script is running and check the Discord channel to confirm that the screenshots are being uploaded automatically.
- You can set both app to start on startup or open them manually whenever you restard your computer.